#✐ Edit this partialGetting started
In short, front-matter variables become props in your react component. You can add react components for layouts or just code components that are reused
throughout your layouts. You can even use all modules npm has to offer.
---
layout: react-component
test: hello world
---

markdown
Now inside your react component code/react-component.js you can import the data.
import React, { Fragment } from 'react';
import PropTypes from 'prop-types';

/**
 * A test component
 */
const Test = ({ _body, test }) => (
  <ul>
    <li>test: { test }</li>
    <li>_body: { _body }</li>
  </ul>
);

export default Test;
Everything that applies to JSX will apply to your layouts here to so make sure you pay attention to the console
and its warnings.
#✐ Edit this partialCreate a new layout
Creating a new layout is as easy as adding a new javascript file to your code folder and exporting a default react component.
💡 You can’t use multiple named exports in a single file.
So a file named code/test.js will be available to front-matter as layout: test. You don’t need to include the extension or the code folder as all layout
paths are relative to that code folder.
See below the smallest layout component I can think of:
import React, { Fragment } from 'react';
import PropTypes from 'prop-types';

/**
 * A test component
 */
const Test = ({ _body }) => (
  <Fragment>
    { _body }
  </Fragment>
);

export default Test;
#✐ Edit this partialCode components vs layout components
The difference of components that are just being used for it’s functionality but are not exposed as a layout is slim. You can put essentially anything inside
the code/ folder. But layout components, those that can be references as layout: x must have a default export.
See below for an example of a code component being used inside a layout component.
// this file is a code component and called util.js

import Slugify from 'slugify'; // you can import anything from node_modules you installed

export MakeSentenceCase = text => text.charAt( 0 ).toUpperCase() + text.slice( 1 ).toLowerCase();
export Handleize = text => Slugify( text );
// this file is a layout component and called test.js

import React, { Fragment } from 'react';
import PropTypes from 'prop-types';
import { Handleize } from './util.js';

/**
 * A test component
 */
const Test = ({ _body, _ID }) => (
  <div id={ Handleize( _ID ) }>
    { _body }
  </div>
);

export default Test;
#✐ Edit this partialThe assets folder
The assets/ folder will be copied as is into your site/ folder on compile time. This means you can organize it the way you want. It also means you may not
want to add your Sass files or unminified js files in there.
Typically it helps if you keep your source files out of this folder and compile them into it. Cuttlebelles watch will notice the new file and move it into it’s
appropriate place inside the site/ folder.
A setup could look like this:
.
├── assets               # this is your assets folder
│   ├── css              # it contains some compiled css
│   │   └── site.min.css
│   └── js               # and some minified javascript
│       └── script.min.js
│
├── code                 # this is your code folder
│   ├── page.js          # with a page layout
│   └── partial.js       # and a partial layout
│
├── content              # we also got your content folder
│   └── index            # with a single page
│       ├── body.md
│       └── index.yml
│
├── js                   # this folder is ignored by Cuttlebelle
│   └── script.js        # you can have your source js here
│                        # that uglifies into your assets folder
│
└── sass                 # the same with your sass
    └── style.scss       # it can compile from here into
                         # your assets folder
Now all you need is to watch your source files and run the appropriate task.
See below an example package.json with some npm scripts.
{
  "name": "Cuttlebelle-test-site",
  "version": "1.0.0",
  "description": "",
  "scripts": {
    "docs": "cuttlebelle docs",
    "build:site": "cuttlebelle",
    "build:sass": "node-sass --output-style compressed -o assets/css sass/style.scss",
    "build:js": "uglifyjs js/script.js --compress --output assets/js/script.js",
    "build": "npm run build:sass && npm run build:js && npm run build:site",
    "watch:sass": "onchange 'sass/**/*.scss' -- npm run build:sass",
    "watch:js": "onchange 'js/**/*.js' -- npm run build:js",
    "watch:site": "cuttlebelle watch -n",
    "watch": "npm run build && npm run watch:sass | npm run watch:js | npm run watch:site"
  },
  "keywords": [],
  "author": "",
  "license": "ISC",
  "devDependencies": {
    "onchange": "^3.3.0"
  },
  "dependencies": {
    "node-sass": "^4.7.2",
    "uglify-js": "^3.3.7"
  }
}
It will compile your Sass into assets/css/style.css and uglify your javascript into assets/js/script.js and watch for changes in all files.
#✐ Edit this partialRelative links
Because you’re generating a static site, relative links are important so that if you move your site to another root folder, all links still work.
To help you manage this problem, Cuttlebelle exposes a default prop called _relativeURL(). This function takes two parameters: The URL you want to link to
and your current ID of the page.
import React, { Fragment } from 'react';
import PropTypes from 'prop-types';

/**
 * A test component
 */
const Test = ({ _body, _relativeURL, _ID }) => (
  <Fragment>
    Relatively speaking the page I want to send you to is at:
    { _relativeURL( '/some/page/deep/within', _ID) }
  </Fragment>
);

export default Test;
This will render a different path depending on what page you’re on.
Try using this as much as you can including when you reference stylesheets or other resources.
Our cheat-sheet has even a custom render function that will apply this function to all markdown links as well.
module.exports = exports = function renderer({ Marked, _relativeURL, _ID }) {

  Marked.link = ( href, title, text ) => {
    if(
      !href.startsWith('http://') &&
      !href.startsWith('https://') &&
      !href.startsWith('#') &&
      typeof _relativeURL === 'function'
    ) {
      href = _relativeURL( href, _ID );
    }

    return `<a href="${ href }"${ title ? ` title="${ title }"` : '' }>${ text }</a>`;
  };

  return Marked;
};
More on how to extend markdown a little further below.
#✐ Edit this partialThe difference between page and partial layouts
There is almost no difference between layouts for partials and layouts for pages. You can use them interchangeably though typically page layouts carry the
broader HTML structure while the partial layouts have only local HTML.
The way you can organize them is to put them into a descriptive folder. that way your content authors will see the distinction more clearly.
An example of a page layout:
import PropTypes from 'prop-types';
import React from 'react';

/**
 * The page layout component
 */
const Page = ({ title, main, _relativeURL, _ID }) => (
  <html>
  <head>
    <title>Cuttlebelle - { title }</title>
    <meta charSet="utf-8" />
    <meta httpEquiv="x-ua-compatible" content="ie=edge" />
    <meta name="viewport" content="width=device-width, initial-scale=1" />
    <link rel="stylesheet" href={
      _relativeURL( `/assets/css/site.css`, _ID ) }
    />
  </head>
  <body>
    <div className="top">
      <main>
        { main }
      </main>
    </div>
  </body>
  </html>
);

export default Page;
An example of a partial layout:
import PropTypes from 'prop-types';
import React, { Fragment } from 'react';

/**
 * The partial component
 */
const Partial = ({ title, _body }) => (
  <article>
    <h2>{ title }</h2>

    { _body }
  </article>
);

export default Partial;
#✐ Edit this partialAsync operations
Sometimes you need to run an async method like fetching data from an API or something on I/O. Since we're rendering react on the server (node context) we won’t
have access to any of the life cycle hooks react offers.
So running something in async UNSAFE_componentWillMount() won’t do us any good as the tainting of the method name already hints at.
And running useEffect and componentWillMount() won’t ever execute.
So much like NextJS, Cuttlebelle has a method you can run that will be executed before we generate the HTML.
Declare a method on your functional component or a static method called getInitialProps in your class component component and whatever is returned
will be added to your props.
💡 Make sure you return an object from getInitialProps or the props will get mashed together.
A typical case in a functional component could look like this:
export default function GetData( props ) {
  return (
    <div>
      My Data: { props.data }
    </div>
  );
}

GetData.getInitialProps = async function( props ) {
  const data = await FetchMyDataFromSomewhere( props._ID );
  return { data };
}
And what it looks like in a class component:
import React, { Component } from 'react';

class GetData extends Component {
  static async getInitialProps( props ) {
    const data = await FetchMyDataFromSomewhere( props._ID );
    return { data };
  }

  render() {
    return (
      <div>
        My Data: { this.props.data }
      </div>
    );
  }
}

export default GetData;
Inside your render method you now have access to whatever was returned from getInitialProps.
In this case an object with the key data.
The getInitialProps method will get all default props passed in.
#✐ Edit this partialEnable self documentation
When working in a team to build a website with Cuttlebelle you may find yourself working with content authors. I like to not assume any technical abilities for
those. I see developers are mainly to empower content authors. To do that Cuttlebelle splits content and code as cleanly as possible.
When a developer creates a new layout, that layout has to make its way to the content authors in a non-technical sort of way.
This is where documentation comes in. Cuttlebelle actually automates this process for you as a build artifact. All developers have to do is add
PropTypes and provide example YAML in a comment for each.
This site comes with its own documentation you can check out.
Let’s have a look at an example documentation that describes each layout for this very site:
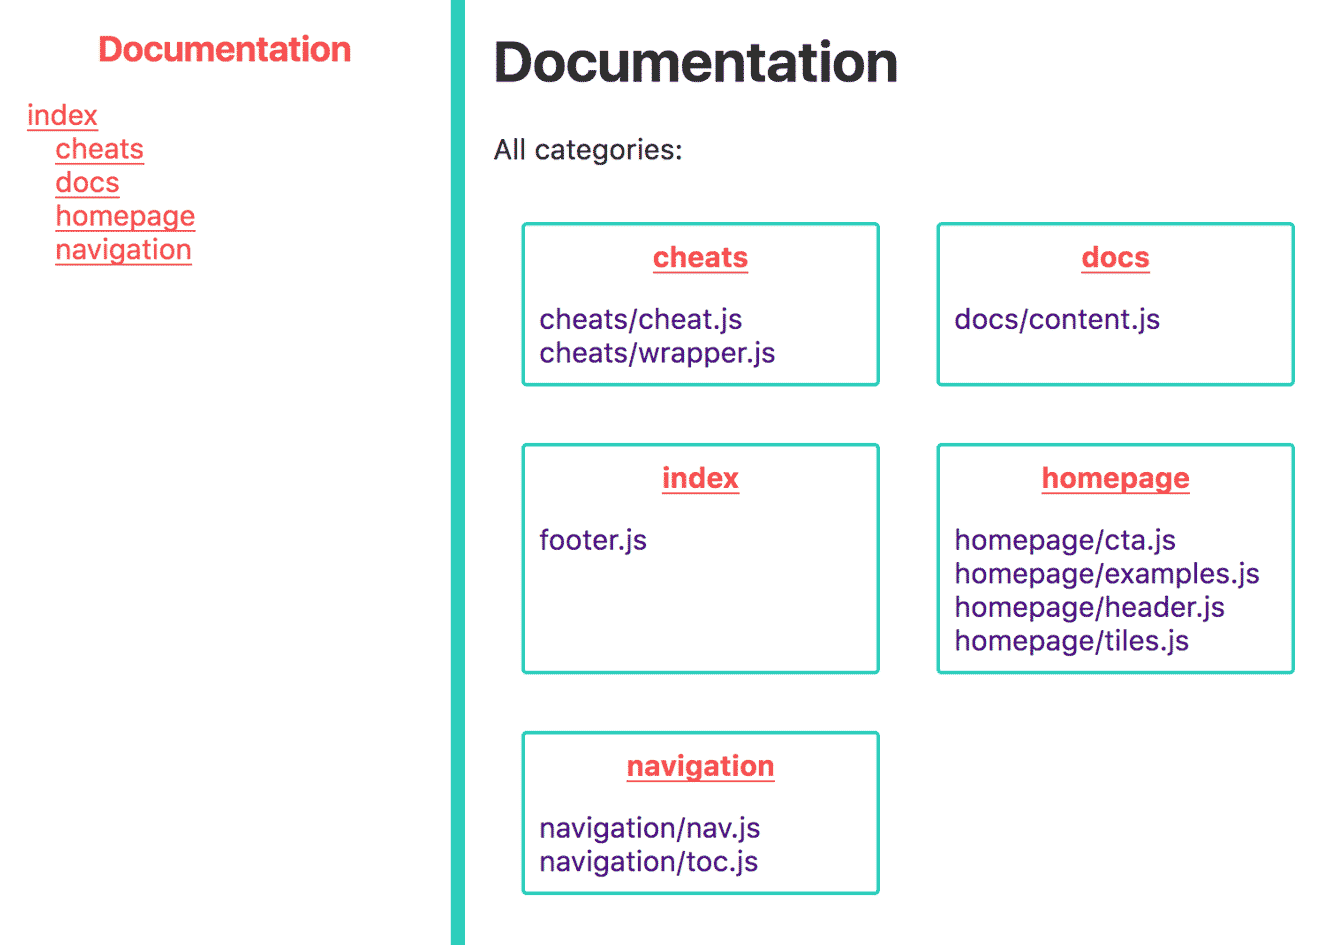
You can see the components are sorted into categories. Those categories mirror the folders you put your layouts into. Organizing your layouts into folders
makes it easier for content authors to know what belongs together and where to use them.
To enable automatic documentation for a simple layout like this:
import PropTypes from 'prop-types';
import React, { Fragment } from 'react';

/**
 * The partial component
 */
const Partial = ({ title, _body }) => (
  <article>
    <h2>{ title }</h2>

    { _body }
  </article>
);

export default Partial;
All we have to do it add PropTypes:
import PropTypes from 'prop-types';
import React, { Fragment } from 'react';

/**
 * The partial component
 */
const Partial = ({ title, _body }) => (
  <article>
    <h2>{ title }</h2>

    { _body }
  </article>
);

+ Partial.propTypes = {
+   /**
+    * title: Section title
+    */
+   title: PropTypes.string.isRequired,
+
+   /**
+    * _body: (test)(12)
+    */
+   _body: PropTypes.node.isRequired,
+ };
+
+ Partial.defaultProps = {
+   title: 'This section',
+ };

export default Partial;
The PropTypes will give you some type safety but also tell Cuttlebelle what this layouts expects. You can give your content author subtle warnings when they
forget a prop but adding .isRequired and even limit it to only a handful of keywords that can be used by using .oneOf().
The other part you need is a comment above each PropType.
Partial.propTypes = {
  /**
   * headline: Section title
   */
  headline: PropTypes.string,
};
This will give Cuttlebelle enough information to fill your component with that example data to present your layout in the documentation. It will also show how
to use this component when you use more complex data like nested array-objects.
Partial.propTypes = {
  /**
   * links:
   *  - name: home
   *    link: /
   *  - name: docs
   *    link: /docs
   *  - name: github  # the string 'github' will have the GitHub logo attached to it
   *    link: https://github.com/cuttlebelle/cuttlebelle
   */
  links: PropTypes.array,
};
For a reference on some common PropType declarations refer to our cheat-sheet.
To generate the docs all you have to run is:
cuttlebelle docs
This will generate the documentation into the docs/ folder by default.
#✐ Edit this partialUsing the watch
The watch tries hard to get out of the way and make it easy and quick for you to iterate over your pages. You may use it when developing layouts or when adding
content. As a rule it tries to only compile what is absolutely has to. That can sometimes not be 100% accurate but you can always run the
double-save.
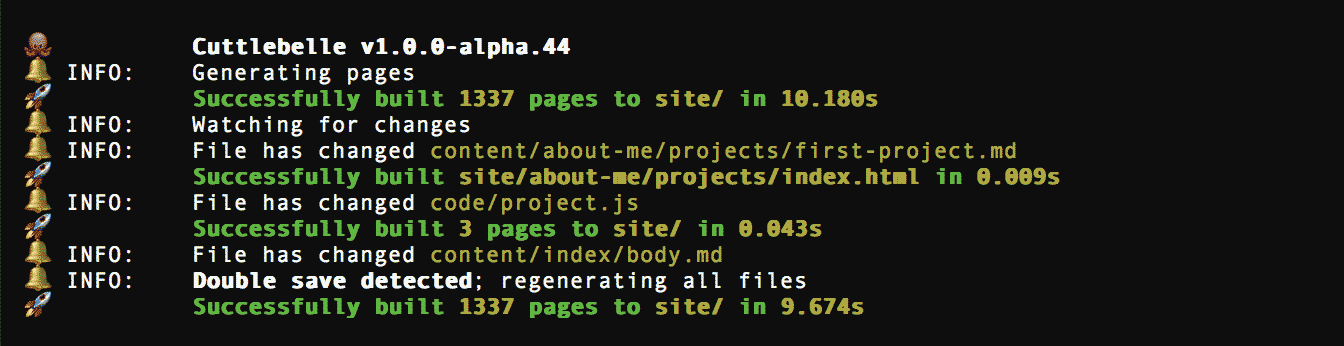
Note from the screenshot above the time it took to generate all pages (~ 10s) vs the time it took to save only one (~ 0.009s).
Using the watch will create a local server, open the site for you in the browser and wait for any changes you make to the file to update the browser
automatically.
cuttlebelle watch
Stop the watch by terminating the process, typically the key combination [cmd] + [c].
#✐ Edit this partialChange the settings
Cuttlebelle comes with some default settings you can find below:
"cuttlebelle": {                  // The cuttlebelle object
  "folder": {                     // Where we can adjust folder/file names
    "content": "content/",        // Where does your content live?
    "code": "code/",              // Where do your react layouts live?
    "assets": "assets/",          // Where do your assets live?
    "site": "site/",              // Where do you want to generate your static site to?
    "docs": "docs",               // Where do you want to generate the docs to?
    "index": "index",             // What is the name of the file we look for to generate pages?
    "homepage": "index"           // What should the index folder be named?
  },
  "layouts": {                    // Your layout settings
    "page": "page",               // What is the default layout for pages?
    "partial": "partial"          // What is the default layout for partials?
  },
  "site": {                       // General settings
    "root": "/",                  // What should cuttlebelle append to links?
    "doctype": "<!DOCTYPE html>", // What doctype string do you want to add?
    "redirectReact": true,        // You can disable redirecting `import` calls to the locally
                                  // installed react instance of cuttlebelle rather than your
                                  // local folder.
    "markdownRenderer": "",       // A path to a file that `module.exports` an Marked.Renderer()
                                  // object. Learn more about it here:
                                  // https://github.com/chjj/marked#renderer
                                  // The only addition is the `preparse` key that will be run
                                  // before we go into the markdown parsing
    "watchTimeout": 400           // This is the time in milliseconds the watch waits
                                  // to detect a double saves action
    "browserSync": {}             // You can overwrite the browserSync options here
                                  // https://www.browsersync.io/docs/options
    "globalProp": {}              // A global prop that can be set here accessible for all pages
  },
  "docs": {                                          // Docs settings
    "root": "files/",                                // What is the root folder called where all
                                                     // categories are generated in
    "index": ".template/docs/layout/index.js",       // The path to the index layout file
    "category": ".template/docs/layout/category.js", // The path to the category layout file
                                                     // All following settings are the default props
                                                     // each component is given for the example

                                                     // The following props are important so we
                                                     // can generate the docs example:
    "IDProp": "page2",                               // The _ID prop
    "selfProp": "body.md",                           // The _self prop
    "navProp": {                                     // The _nav prop
      "index": {
        "page1": "page1",
        "page2": {
          "page2/nested": "page2/nested"
        },
        "page3": "page3"
      }
    },
    "pagesProp": {                                   // The _pages prop
      "page1": {
        "_url": "/page1",
        "title": "Page 1"
      },
      "page2": {
        "_url": "/page2",
        "title": "Page 2"
      },
      "page2/nested": {
        "_url": "/page2/nested",
        "title": "Nested in page 2"
      },
      "page3": {
        "_url": "/page3",
        "title": "Page 3"
      },
      "index": {
        "_url": "/",
        "title": "Homepage"
      }
    }
  }
}
To change any of the settings Cuttlebelle looks into your local package.json file for the cuttlebelle object.
Let’s take the default package.json content:
{
  "name": "your name",
  "version": "1.0.0",
  "description": "Your description",
  "main": "index.js",
  "scripts": {
    "test": "echo \"Error: no test specified\" && exit 1"
  },
  "keywords": [],
  "author": "",
  "license": "ISC"
}
And just make a change to the site folder like so:
{
  "name": "your name",
  "version": "1.0.0",
  "description": "Your description",
  "main": "index.js",
  "scripts": {
    "test": "echo \"Error: no test specified\" && exit 1"
  },
+ "cuttlebelle": {
+   "folder": {
+     "site": "anotherfolder"
+   }
+ },
  "keywords": [],
  "author": "",
  "license": "ISC"
}
Run Cuttlebelle and see your pages generate into the anotherfolder/ folder.
A complete list of all settings can be found in our cheat-sheet.
#✐ Edit this partialExtend markdown
You may find yourself in need to extend the built in markdown parser. You may just want to add a class or you may want to add
more complex logic. No matter what your requirements are, we got you covered.
To extend markdown you will have to create a javascript file and add the path to that file into your settings object inside your package.json.
{
  "name": "your name",
  "version": "1.0.0",
  "description": "Your description",
  "main": "index.js",
  "scripts": {
    "test": "echo \"Error: no test specified\" && exit 1"
  },
+ "cuttlebelle": {
+   "site": {
+     "markdownRenderer": "yourextension.js"
+   }
+ },
  "keywords": [],
  "author": "",
  "license": "ISC"
}
Inside yourextension.js file make sure you export a function called renderer and return the passed in Marked object.
See the boilerplate below:
module.exports = exports = function renderer({ Marked }) {

  // this is where you add your markdown extension

  return Marked;
};
Cuttlebelle actually passes a bunch of props to you that you may find helpful. You can
destruct them inside your renderer function.
module.exports = exports = function renderer({
  Marked,      // The Marked instance you want to extend
  _ID,         // The ID of the current page
  _parents,    // An array of all parent pages IDs
  _storeSet,   // The store setter
  _store,      // The store getter
  _nav,        // A nested object of your site structure
  _globalProp, // A prop that can be set globally from the `package.json`
  _relativeURL // A helper function to make an absolute URL relative
}) {

  // this is where you add your markdown extension

  return Marked;
};
Now add one or more of the methods you want to overwrite. See a complete list in our cheat-sheet.
module.exports = exports = function renderer({
  Marked,
  _ID,
  _parents,
  _storeSet,
  _store,
  _nav,
  _globalProp,
  _relativeURL
}) {

  // adding a class
  Marked.hr = () => {
    return `<hr class="my-custom-class">\n`;
  }

  // making all links relative
  Marked.link = ( href, title, text ) => {
    if(
      !href.startsWith('http://') &&
      !href.startsWith('https://') &&
      !href.startsWith('#') &&
      typeof _relativeURL === 'function'
    ) {
      href = _relativeURL( href, _ID );
    }

    return `<a href="${ href }"${ title ? ` title="${ title }"` : '' }>${ text }</a>`;
  };

  return Marked;
};
#✐ Edit this partialDefault props
All default props begin with an underscore _ to avoid overwriting possible user settings.
| prop name |
description |
_ID |
The ID of the current page |
_self |
The relative path to the content file; can be md or yaml file |
_isDocs |
A boolean value, true in docs context only |
_parents |
An array of all parent pages IDs |
_body |
The body of your markdown file (empty for index.yml files) |
_pages |
An object of all pages and their props; with ID as key |
_nav |
A nested object of your site structure |
_globalProp |
A prop that can be set globally from the package.json |
_storeSet |
You can set data to persist between react components by setting them with this helper |
_store |
To get that data just call this prop function |
_relativeURL |
A helper function to make an absolute URL relative |
_parseMD |
A helper function to parse markdown into HTML |
_parseYaml |
A helper function to parse yaml into an object |
_parseReact |
A helper function to parse a react component into a string |
_ID
The _ID of the current page. IDs in cuttlebelle point to a page and a derived from their relative url. They are therefor unique to each page.
The exception is the index page. This page will be named index by default and can be changed in the settings.
import React, { Fragment } from 'react';
import PropTypes from 'prop-types';

/**
 * A test component
 */
const Test = ({ _ID }) => (
  <Fragment>
    { _ID }
  </Fragment>
);

export default Test;
This could output:
/foo/bar/ => foo/bar
/foo/     => foo
/         => index
_self
_self is the relative path of the current partial markdown or index.yml.
import React, { Fragment } from 'react';
import PropTypes from 'prop-types';

/**
 * A test component
 */
const Test = ({ _self }) => (
  <Fragment>
    { _self }
  </Fragment>
);

export default Test;
This could output:
page2/index.yml
page1/partial1.md
page4/subpage/partial-x.md
_isDocs
_isDocs is a boolean that let’s you know if your layout is running in docs content or not. In the docs you may not have all variables available to you so
this comes in handy to write alternative logic so your automated documentation is still spot on.
The value will be false when compiling with cuttlebelle but true when you compile your layouts with cuttlebelle docs.
_parents
This is an array of all parent pages IDs of the current page. The index page is always the absolute last parent.
import React, { Fragment } from 'react';
import PropTypes from 'prop-types';

/**
 * A test component
 */
const Test = ({ _parents }) => (
  <Fragment>
    { JSON.stringify( _parents ) }
  </Fragment>
);

export default Test;
.
├── overview
├── products
│   └── product1
│       └── detail
└── index
If we had the above pages and we are on the detail page we would get:
[
  "products/product1/detail"
  "products/product1",
  "products",
  "index",
]
_body
The parsed HTML of your markdown file (This prob is empty for all index.yml files).
import React, { Fragment } from 'react';
import PropTypes from 'prop-types';

/**
 * A test component
 */
const Test = ({ _body }) => (
  <Fragment>
    { _body }
  </Fragment>
);

export default Test;
Let’s assume a markdown file like below:
---
layout: test
---

Hi there **world**.
Then our output would be:
<div>Hi there <strong>world</strong>.<div>
_pages
This is an object of all pages and their props; with _ID as their key.
Each page also get the _url prop automatically attached.
.
├── overview
├── products
│   └── product1
│       └── detail
└── index
Given the structure above; this is what the _pages object would look like:
{
  "overview": { /* all props and data etc of this page */ },
  "products": { /* all props and data etc of this page */ },
  "products/product1": { /* all props and data etc of this page */ },
  "products/product1/detail": { /* all props and data etc of this page */ }
  "index": { /* all props and data etc of this page */ },
}
The object for a single page _pages[ 'index' ] could look something like this depending on what you pass in:
{
  "title": "Homepage",
  "header": ["/_shared/header.md"],
  "main": ["body.md"],
  "footer": ["/_shared/footer.md"],
  "_url": "/"
}
_nav
This is a nested object of your site structure with the IDs as keys and values.
.
├── overview
├── products
│   └── product1
│       └── detail
└── index
Given the structure above; this is what the _nav object would look like:
{
  "overview": "overview",
  "products": {
    "product1": {
      "detail": "detail"
    }
  },
  "index": "index"
}
You can use those IDs to look more data up via the _pages prop.
Object.keys( _nav ).map( ( page, i ) => (
  console.log( _pages[ page ]._url );
));
_globalProp
You can set a global prop for your website. This will then be passed into this object.
This can be good to control different builds for dev and prod environments etc.
Inside your package.json file you would register it via:
{
  "name": "your name",
  "version": "1.0.0",
  "description": "Your description",
  "main": "index.js",
  "scripts": {
    "test": "echo \"Error: no test specified\" && exit 1"
  },
+ "cuttlebelle": {
+   "site": {
+     "globalProp": "dev"
+   }
+ },
  "keywords": [],
  "author": "",
  "license": "ISC"
}
And inside any of your components:
import React, { Fragment } from 'react';
import PropTypes from 'prop-types';

/**
 * A test component
 */
const Test = ({ _globalProp }) => (
  <Fragment>
    Environment: { _globalProp }
  </Fragment>
);

export default Test;
_storeSet
You can set data to persist between partials by setting them with this helper.
This can be helpful if you want to let a layout know something has happened.
The data will be added one partial at the time. So if you add the data in one partial, the next will have access to it.
_storeSet({ variable: "value" });
If you call _store() inside another partial that was included below the above partial then you get:
{ variable: "value" }
_store
To get the data set by _storeSet just call this helper function.
console.log( _store() );
_relativeURL
A helper function to make an absolute URL relative. First argument is the target, second is the base.
_relativeURL( '/foo/bar', '/foo' );
This would give us 'bar'. In Cuttlebelle, use it with the page _ID
_relativeURL( '/foo/bar', _ID )
If _ID is e.g. /foobar then the output of above will be: '../foo/bar'.
_parseMD
A helper function to parse markdown into HTML.
const markdownString = 'Hello **World**';

_parseMD( markdownString );
The output would be 'Hello <strong>World</strong>'.
_parseYaml
A helper function to parse YAML into an javascript object.
const yamlString = `
  test:
    - one
    - two
`;

_parseYaml( yamlString );
The output would be [ 'one', 'two' ].
_parseReact
A helper function to parse a react component into a string
import Card from './cards';

_parseReact( <Card name="Card name" shadow={ true } /> );
The output would be whatever your component renders out as a string.
You can use it via dangerouslySetInnerHTML but you might as well use it directly then.